


Wiring Your Truck for Trailer Lights: A Comprehensive Guide
Towing a trailer opens up a world of possibilities, from hauling equipment and recreational vehicles to embarking on camping adventures. However, before you hit the road, ensuring your trailer’s lights are properly connected and functioning is not just a matter of convenience—it’s a critical aspect of safety and legal compliance. Properly wiring your truck for trailer lights ensures that your turns, stops, and presence are clearly communicated to other drivers, preventing accidents and costly citations. This comprehensive guide will walk you through everything you need to know about wiring your truck for trailer lights, empowering you to tackle this essential task with confidence.
Understanding the Essentials of Trailer Light Systems
At its core, a trailer lighting system mirrors the essential functions of your truck’s rear lights:
- Running/Tail Lights: These illuminate when your headlights are on, indicating the trailer’s presence and width.
- Brake Lights: These activate when you press your brake pedal, signaling deceleration or a stop.
- Turn Signals: These flash to indicate your intention to turn left or right.
- Ground: A crucial common return path for all electrical circuits, ensuring proper function.
Beyond these basic functions, more complex trailer setups might require additional circuits for:
- Reverse Lights: Illuminating when the vehicle is in reverse.
- 12V Constant Power: Providing continuous power for accessories, charging batteries, or interior lights on the trailer.
- Electric Trailer Brakes: Controlling the braking system on trailers equipped with electric brakes.
The most common electrical standard for trailer wiring in North America is 12-volt DC. Understanding these fundamental circuits is the first step towards successful wiring.
Essential Components for Trailer Wiring
Before you begin, gather the necessary components and tools. The specific items you need will depend on your truck’s existing wiring, the type of trailer you’ll be towing, and the complexity of its lighting system.
Key Components:
-
Trailer Wiring Harness: This is the backbone of your connection.
- Direct-Fit Harness (Plug-and-Play): Many modern trucks have factory-installed wiring points for a direct-fit harness, which simply plugs into existing connectors, greatly simplifying installation.
- Universal Harness: For older trucks or those without factory connectors, a universal harness taps into your vehicle’s tail light wiring.
- Converter/Adapter: If your truck has separate turn and brake light bulbs (e.g., amber turn signals and red brake lights), but your trailer uses combined turn/brake signals (most common trailers), you will need a taillight converter. This device combines your truck’s separate signals into the single combined signal required by the trailer.
-
Trailer Connector: This is the interface between your truck and the trailer. Common types include:
- 4-Way Flat: The most basic, for running, brake/turn (left), brake/turn (right), and ground.
- 5-Way Flat: Adds a circuit, typically for reverse lights or hydraulic surge brake lockout.
- 6-Way Round: Often used for horse trailers or older campers, adding electric brakes or a 12V constant.
- 7-Way RV Blade: The most comprehensive, offering running, brake/turn (left), brake/turn (right), ground, 12V constant, electric brakes, and reverse lights.
-
Wire: Ensure you have enough wire of appropriate gauge. Thicker wire (lower gauge number) is needed for higher current draws or longer runs.
-
Connectors/Splices:
- Butt Connectors: For joining two wires end-to-end.
- Tap Connectors (Scotch-Loks): For quickly tapping into an existing wire (use with caution, as they can sometimes damage wires or create unreliable connections).
- Ring/Fork Terminals: For connecting to ground points or power sources.
-
Fuses and Fuse Holders: Essential for protecting your vehicle’s electrical system from short circuits.
-
Wire Loom/Conduit: For protecting wires from abrasion, heat, and moisture.
-
Dielectric Grease: To protect electrical connections from corrosion.
-
Zip Ties/Mounting Hardware: For securing wires and the connector.
Essential Tools:
- Wire Strippers: For removing wire insulation.
- Crimpers: For securely attaching connectors to wires.
- Multimeter/Circuit Tester: Indispensable for identifying wires and testing connections.
- Screwdrivers/Wrenches: For accessing vehicle panels and mounting components.
- Heat Gun (for heat shrink connectors): Provides a waterproof seal.
- Drill (if mounting a new connector bracket).
Step-by-Step Guide: Wiring Your Truck for Trailer Lights
This guide outlines a general process. Always consult your truck’s owner’s manual or a specific wiring diagram for your make and model.
Step 1: Preparation and Safety First
- Gather Tools and Components: Lay out everything you need.
- Disconnect the Battery: Crucial for safety. Disconnect the negative terminal to prevent accidental shorts or electrical shocks.
- Identify Wiring Access: Determine the easiest way to access your truck’s tail light wiring. This is usually behind the tail light assemblies or under the truck bed near the bumper.
Step 2: Choosing and Installing the Harness/Converter
- Direct-Fit Harness: If you have a direct-fit harness, simply locate the factory connectors (often behind the tail lights or bumper) and plug in the harness. Follow the manufacturer’s instructions for routing and securing the wires.
- Universal Harness/Converter:
- Locate Vehicle Wires: Use a circuit tester or multimeter to identify the wires for your truck’s:
- Tail/Running Lights: Will have 12V when headlights are on.
- Left Turn Signal: Will pulse 12V when left turn signal is on.
- Right Turn Signal: Will pulse 12V when right turn signal is on.
- Brake Lights: Will have 12V when brake pedal is pressed (or if combined with turn signals, will have 12V when brake is pressed AND turn signal is off).
- Ground: A consistent ground point (often bolted to the frame).
- Mount the Converter (if needed): Find a dry, secure location near your truck’s tail lights for the converter box.
- Make Connections to Vehicle Wires: Using crimp connectors or soldering, splice the corresponding wires from your universal harness or converter to your truck’s identified wires. Match colors carefully (e.g., converter’s brown to truck’s tail light wire).
- Connect Converter/Harness Power (for some models): Some converters or 7-way harnesses require a separate 12V power wire directly from the battery (with an inline fuse) to power the trailer lights, especially if the vehicle’s existing circuits cannot handle the extra load.
- Locate Vehicle Wires: Use a circuit tester or multimeter to identify the wires for your truck’s:
Step 3: Routing and Protecting the Trailer Connector Wires
- Run the Harness: Route the wires from your truck’s tail light area to the rear bumper where the trailer connector will be mounted.
- Secure the Wires: Use zip ties to secure the wires along the frame or existing wiring bundles, keeping them away from hot exhaust components, moving parts, and sharp edges.
- Protect the Wires: Encase the wires in wire loom or conduit to protect them from road debris, heat, and moisture.
Step 4: Mounting the Trailer Connector
- Choose a Location: Select a convenient and protected spot near the hitch receiver, typically mounted to the bumper or a specialized bracket.
- Mount the Bracket: If not using an existing bracket, drill holes and secure the connector bracket.
- Wire the Connector: Strip the ends of the harness wires and connect them to the appropriate terminals on the back of the trailer connector. Refer to a standard wiring diagram for the connector type (e.g., 4-way, 7-way). Apply dielectric grease to the connections.
- Secure the Connector: Fasten the connector firmly to the bracket.
Step 5: Testing the System
-
Reconnect Battery: Reconnect the negative battery terminal.
-
Use a Trailer Light Tester or Actual Trailer:
- Plug in your trailer light tester or your trailer.
- Turn on your truck’s headlights/parking lights – the trailer’s tail lights should illuminate.
- Activate the left turn signal – the trailer’s left turn light should flash.
- Activate the right turn signal – the trailer’s right turn light should flash.
- Press the brake pedal – the trailer’s brake lights should illuminate.
- If you have a 7-way, test the 12V constant (e.g., by plugging in a small 12V accessory into the trailer if equipped) and the electric brake signal (requires a brake controller and appropriate tester).
-
Troubleshooting: If lights aren’t working, recheck connections, grounds, fuses, and wire identification.
Important Considerations and Best Practices
- Wire Gauge: Use appropriate wire gauge. Undersized wires can overheat, causing dim lights or even fires. Consult wiring charts based on current draw and wire length.
- Grounding is Key: A poor ground connection is the most common cause of trailer light problems. Ensure your ground wire is securely attached to a clean, bare metal surface on the truck’s frame.
- Weatherproofing: Use heat-shrink connectors, wire loom, and dielectric grease on all exposed connections to prevent corrosion, which is a leading cause of electrical failure in trailer wiring.
- Fuse Protection: Always include an inline fuse for any new power wire you run from the battery to protect your vehicle’s electrical system.
- Legal Compliance: Ensure your wiring meets local and federal regulations for trailer lighting.
- Electric Brake Controller: If your trailer has electric brakes (common on trailers over 1,500 lbs), you will need to install a separate electric brake controller inside your truck’s cabin. This device senses your truck’s braking action and sends a proportional signal to the trailer’s brakes.
Types of Trailer Connectors Explained
Understanding the different connector types is crucial for matching your truck to your trailer.
- 4-Way Flat:
- Wires: 4 (Ground, Tail/Running, Left Turn/Brake, Right Turn/Brake)
- Use: Basic utility trailers, small boat trailers, car-top carriers.
- 5-Way Flat:
- Wires: 5 (4-way functions + typically reverse lights or hydraulic surge brake lockout)
- Use: Trailers with surge brakes or those needing reverse lights.
- 6-Way Round:
- Wires: 6 (4-way functions + 12V constant + electric brakes or auxiliary)
- Use: Older campers, some horse trailers. Less common on new vehicles.
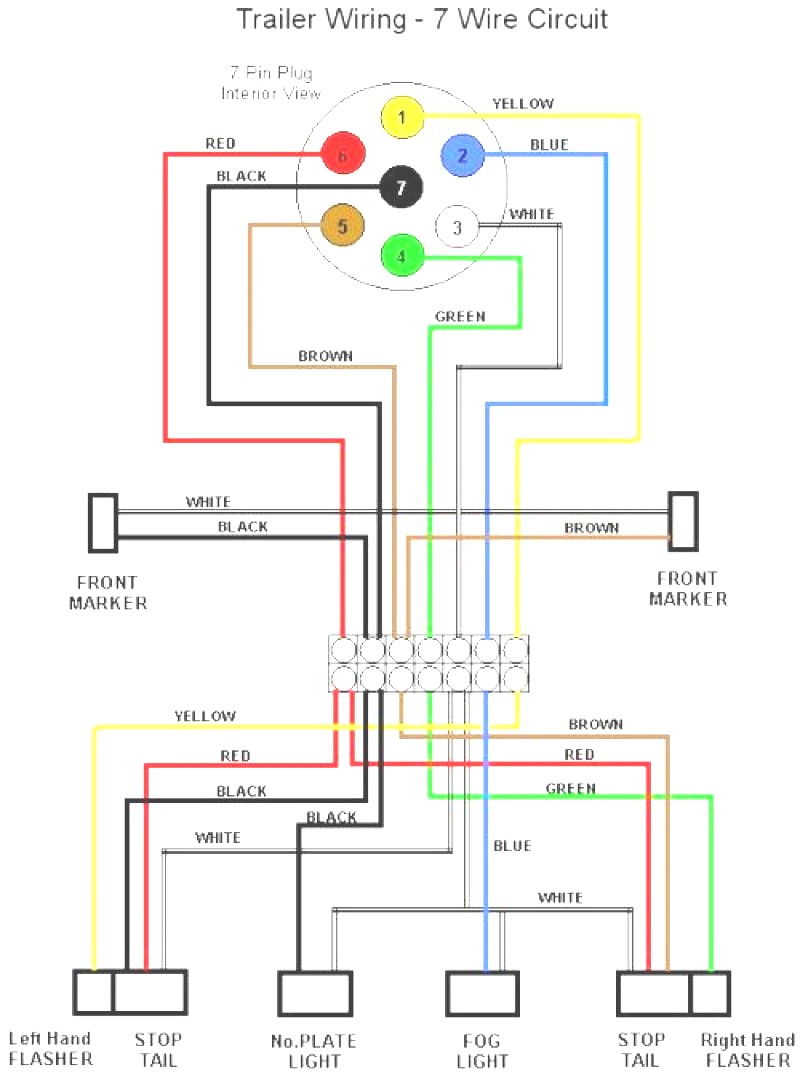
- 7-Way RV Blade:
- Wires: 7 (4-way functions + 12V constant + electric brakes + reverse lights)
- Use: Large travel trailers, RVs, car haulers, utility trailers with electric brakes or multiple electrical accessories. Most comprehensive and modern standard.
Challenges and Solutions
- Challenge: My truck has separate amber turn signals, but my trailer uses combined red turn/brake lights.
- Solution: Install a taillight converter. This device takes your truck’s three separate signals (tail, turn, brake) and converts them into the two combined signals (tail, combined turn/brake) required by most trailers.
- Challenge: Trailer lights are dim or not working intermittently.
- Solution: Check your ground connection first. Ensure it’s clean, tight, and free of rust. Then check all other connections for corrosion or looseness. Verify the fuse is intact and of the correct amperage.
- Challenge: My trailer has electric brakes, but they aren’t working.
- Solution: You need a trailer brake controller installed in your truck. Ensure it’s properly wired and calibrated. Check the 7-way connector’s electric brake pin for voltage when the brake pedal is pressed.
- Challenge: Wires are exposed and getting damaged.
- Solution: Use wire loom or conduit to protect wires from abrasion, heat, and moisture. Secure wires firmly with zip ties to prevent sagging or snagging.
Estimated Cost Table for Wiring Truck for Trailer Lights
The cost of wiring your truck for trailer lights can vary significantly based on whether you DIY or hire a professional, and the complexity of the system required.
| Component/Service | Estimated Cost (DIY) | Estimated Cost (Professional Installation) | Notes

