Utility Lights for Trucks: Illuminating Your Work and Enhancing Safety
Utility Lights for Trucks: Illuminating Your Work and Enhancing Safety
In the demanding world of professional trucking, off-road adventures, and emergency services, visibility is not just a convenience—it’s a critical safety factor and a key driver of productivity. While standard headlights and taillights serve their primary purpose, they often fall short when tasks extend beyond the well-lit confines of a highway or when operating in challenging environments. This is where utility lights for trucks step in, transforming the darkness into a well-lit workspace or a safe recreational zone.
Utility lights, also known as work lights, auxiliary lights, scene lights, or floodlights, are specialized illumination devices designed to provide intense, focused, or broad-area lighting around a truck. Unlike driving lights that are primarily forward-facing for road navigation, utility lights are strategically mounted to illuminate specific areas for tasks such as loading/unloading, equipment operation, roadside repairs, campsite setup, or emergency response. Their importance cannot be overstated; they enhance safety for operators and bystanders, improve efficiency by allowing work to continue regardless of ambient light, and increase the versatility of the truck itself. This comprehensive guide will delve into every aspect of utility lights for trucks, from their fundamental purpose to installation, maintenance, and the best practices for maximizing their potential.
I. What Are Utility Lights for Trucks?
At their core, utility lights are supplementary lighting solutions engineered for rugged environments and demanding applications. They are built to withstand vibrations, moisture, dust, and temperature extremes, far exceeding the durability of typical automotive lighting. Their primary function is to cast a powerful beam of light onto an area where work is being performed or where enhanced visibility is crucial.
These lights are not regulated by the same stringent rules as headlights for on-road use, allowing for much higher light output and a wider variety of beam patterns. They are typically powered by the truck’s 12V or 24V electrical system and controlled by independent switches, often integrated with relays for safe operation. From small LED pods illuminating a hitch to massive light bars transforming a worksite into daylight, utility lights come in a myriad of shapes, sizes, and power outputs, each tailored for specific needs.
II. Why Are Utility Lights Essential for Your Truck?
Investing in quality utility lights offers a multitude of benefits that extend beyond mere illumination:
- Enhanced Safety: This is perhaps the most critical benefit. Working in low-light conditions significantly increases the risk of accidents. Utility lights illuminate obstacles, trip hazards, and moving parts, protecting the operator and anyone in the vicinity. For off-roaders, they reveal terrain features that could lead to rollovers or damage.
- Increased Productivity: When work isn’t confined to daylight hours, utility lights ensure that tasks like loading, unloading, equipment maintenance, or setting up a campsite can proceed efficiently, regardless of the time. This translates directly to more uptime and greater operational output.
- Improved Visibility for Specific Tasks: Whether it’s hooking up a trailer in the dark, performing an engine check on the side of the road, or navigating a tight trail, standard vehicle lights often don’t provide the directed illumination needed for precise tasks. Utility lights fill this gap, offering targeted lighting exactly where it’s needed.
- Versatility and Adaptability: A truck equipped with proper utility lighting becomes a more versatile tool. Service trucks can become mobile repair stations, farm trucks can operate into the night during harvest, and recovery vehicles can safely manage incidents in any condition.
- Compliance and Professionalism: For many commercial applications, adequate lighting is a regulatory requirement. Beyond compliance, a well-lit work area projects professionalism and reliability to clients and colleagues.
III. Types and Categories of Utility Lights
Utility lights can be categorized based on several factors, each influencing their application:
A. By Beam Pattern:
- Flood Lights: Produce a wide, diffused beam, ideal for illuminating a large area directly in front or to the sides of the truck. Perfect for scene lighting, general work areas, or campsite illumination.
- Spot Lights: Generate a narrow, concentrated beam that travels a long distance. Useful for identifying distant objects, trail navigation, or long-range inspection.
- Combo Lights: Combine both flood and spot patterns within a single housing (often a light bar), offering versatility with a mix of spread and distance.
- Scene Lights: Designed to illuminate an exceptionally wide area, often 180 degrees or more, typically found on emergency vehicles or large work trucks to light up an entire incident scene.
B. By Light Source:
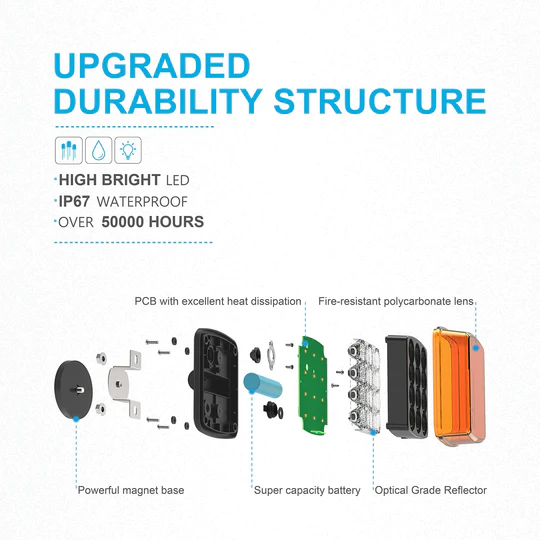
- LED (Light Emitting Diode): The dominant technology today. LEDs are highly energy-efficient, incredibly durable, have a long lifespan (50,000+ hours), and offer instant-on illumination. They are compact, allowing for various form factors.
- Halogen: Older, less efficient technology. Halogen lights produce a warmer light but generate significant heat, consume more power, and have a shorter lifespan. They are generally less expensive upfront.
- HID (High-Intensity Discharge): Brighter and more efficient than halogen but less so than LED. HIDs require a ballast, take a moment to warm up, and are more fragile. Less common for utility applications now due to LED advancements.
C. By Mounting Style:
- Surface Mount: Most common, directly bolted onto a flat surface (bumper, roof rack, headache rack).
- Flush Mount: Integrated into a cutout in the bodywork, offering a clean, low-profile look. Often used for backup lights or side illumination.
- Magnetic Mount: Features powerful magnets for temporary, non-permanent attachment. Ideal for situations requiring flexible placement or when drilling is not an option.
- Bar/Grille Mount: Specifically designed brackets to mount light bars or individual pods to bull bars, grilles, or roof racks.
D. Specific Applications:
- Work Lights: General term for lights illuminating a work area.
- Backup Lights: Mounted at the rear to enhance visibility when reversing, especially with trailers.
- Area Lights: Similar to floodlights, designed to cast broad illumination around the truck.
- Rock Lights: Small, durable LED lights mounted underneath the vehicle to illuminate the terrain directly below, crucial for off-roading.
IV. Key Features and Considerations When Choosing Utility Lights
Selecting the right utility lights involves more than just picking the brightest option. Consider these factors:
- Brightness (Lumens/Lux): Lumens measure the total light output, while Lux measures the intensity of light at a specific distance. More lumens generally mean more light, but the beam pattern dictates how that light is distributed. For work lights, aim for at least 1,500-3,000 lumens per light, depending on the area to be lit.
- Durability (IP Rating, Housing Material): Look for an IP (Ingress Protection) rating of at least IP67 (dust tight, protected against immersion up to 1m) or IP68 (dust tight, protected against continuous immersion). Housings should be robust, typically made from die-cast aluminum, with shatterproof polycarbonate lenses.
- Power Consumption (Watts/Amps): While LEDs are efficient, powerful light bars can still draw significant current. Ensure your truck’s electrical system (alternator and battery) can handle the additional load. Consider adding a secondary battery for extensive setups.
- Color Temperature (Kelvin): Measured in Kelvin (K). Lower Kelvin (e.g., 3000K) is warm white/yellowish, while higher Kelvin (e.g., 6000K) is cool white/bluish. For utility work, 5000K-6000K (daylight white) is generally preferred as it offers good contrast and reduces eye strain.
- Mounting Options: Consider where you plan to mount the lights and ensure the chosen product comes with appropriate brackets or is compatible with aftermarket mounting solutions.
- Wiring and Installation: Evaluate the complexity. Does it come with a wiring harness, relay, and switch? Simple plug-and-play kits are available, but custom setups might require more electrical knowledge.
- Voltage: Most trucks use 12V DC, but some heavy-duty vehicles run on 24V DC. Ensure the lights match your truck’s voltage.
- Brand Reputation and Warranty: Stick to reputable brands known for quality and customer support. A good warranty indicates manufacturer confidence in their product.
V. Installation Guide: Wiring Your Utility Lights
While specific steps vary, the general principle for installing utility lights involves a safe, fused, and switched circuit. If you’re uncomfortable with automotive electrical work, professional installation is recommended.
Tools and Materials:
- Utility lights with mounting hardware
- Appropriate gauge wire (check light’s power draw)
- Inline fuse holder and fuse (matched to light’s amperage)
- 12V automotive relay (e.g., 4-pin or 5-pin SPDT)
- On/off switch
- Wire strippers, crimpers, heat gun (for heat shrink connectors)
- Electrical tape, zip ties, wire loom
- Multimeter
- Drill and bits (if drilling required)
- Safety glasses and gloves
Basic Wiring Steps (Using a Relay):
- Disconnect Battery: ALWAYS disconnect the negative terminal of your truck’s battery before starting any electrical work.
- Mount Lights: Securely attach the utility lights to your desired location using the provided hardware. Ensure they are stable and positioned for optimal light coverage.
- Run Power Wire to Relay (Pin 30): Connect a heavy-gauge wire from the positive terminal of your battery (or a fused distribution block) to Pin 30 on your relay. Install an inline fuse as close to the battery as possible.
- Connect Lights to Relay (Pin 87): Run a wire from Pin 87 on the relay to the positive wire of your utility lights. For multiple lights, you might splice them or run separate wires if they draw significant power.
- Ground the Lights: Connect the negative wire of your utility lights to a clean, unpainted metal surface on the truck chassis (a good ground point) or directly back to the battery’s negative terminal.
- Run Switched Power to Relay (Pin 86): Connect a wire from a fused ignition-switched power source (e.g., an add-a-circuit in your fuse box or a dedicated accessory wire) to one terminal of your switch. Run a wire from the other terminal of your switch to Pin 86 on the relay. This is your "trigger" wire.
- Ground the Relay (Pin 85): Connect Pin 85 on the relay to a good ground point on the truck chassis.
- Organize and Protect Wires: Use wire loom and zip ties to neatly route all wires, keeping them away from hot or moving parts. Secure all connections with heat shrink connectors or high-quality crimps and electrical tape.
- Reconnect Battery and Test: Once all connections are secure, reconnect the battery. Test the lights by activating the switch. Ensure they illuminate correctly and that the fuse doesn’t blow.
Why a Relay? A relay is crucial because it allows a low-current switch to control a high-current circuit. Your small dash switch only triggers the relay, which then uses a separate, heavy-duty circuit directly from the battery to power the lights, preventing damage to the switch and ensuring full power delivery to the lights.
VI. Maintenance and Troubleshooting
Utility lights are designed to be robust, but regular maintenance can extend their lifespan:
- Regular Cleaning: Dirt, mud, snow, and road grime can significantly reduce light output. Clean the lenses with a soft cloth and mild soap and water. Avoid abrasive cleaners.
- Check Connections: Periodically inspect all wiring connections for corrosion, looseness, or damage. Ensure grounds are clean and secure.
- Inspect Housing: Look for cracks in the housing or lens, which can allow moisture ingress. Seal any minor damage with silicone sealant.
- Bulb Replacement (for Halogen/HID): If using older technology, bulbs will eventually burn out. Replace with the correct type and wattage. LEDs typically don’t have replaceable "bulbs."
Common Troubleshooting:
- Lights Don’t Turn On: Check the fuse (is it blown?), check all wiring connections (are they loose or corroded?), test the switch (is it faulty?), test the relay (is it clicking?), and confirm the light unit itself is receiving power and is properly grounded.
- Lights Flicker: Often indicates a loose or corroded connection, a faulty ground, or insufficient power delivery (voltage drop).
- Dim Output: Could be dirty lenses, aging halogen/HID bulbs, or voltage drop due to undersized wiring.
- Moisture Inside Lens: Indicates a compromised seal. Disassemble if possible, dry thoroughly, and reseal before reassembly.
VII. Practical Applications and Best Practices
Utility lights serve a diverse range of trucks and purposes:
- Construction and Commercial Trucks: Essential for illuminating job sites, loading docks, and equipment.
- Service and Utility Vehicles: Crucial for roadside repairs, power line work, and mobile maintenance.
- Off-Road and Overlanding Vehicles: Provide critical visibility for navigating trails, setting up camp, and vehicle recovery in challenging terrain. Rock lights are invaluable here.
- Emergency Services (Fire, EMS, Police): Scene lights are vital for illuminating accident sites, ensuring safety for responders and victims.
- Agricultural and Farm Vehicles: Extend working hours during planting and harvesting seasons, making night operations safer and more efficient.
Best Practices:
- Strategic Placement: Consider your primary use. Roof-mounted lights offer broad area illumination. Bumper-mounted lights are good for forward work. Side-mounted lights are great for illuminating the truck’s flanks. Rear-mounted lights are perfect for backing up or hitching.
- Aiming: Proper aiming prevents glare and maximizes effective illumination. For work lights, aim them slightly downward to minimize shadows and create a uniform light spread.
- Legal Considerations: Be aware of local laws regarding auxiliary lighting. In many areas, utility lights are only legal for off-road or off-highway use, or when the vehicle is stationary. Do not use them on public roads if they cause glare to other drivers.
- Combine Beam Patterns: For ultimate versatility, use a combination of flood (for wide area) and spot (for distance) lights.
Price Table for Utility Lights for Trucks (Estimated Ranges)
Please note that prices can vary significantly based on brand, quality, lumens, IP rating, and specific features. These are general estimated ranges as of mid-2024.
| Light Type / Category | Description | Estimated Price Range (USD) | Key Features/Notes |
|---|---|---|---|
| Small LED Pod (Single/Pair) | 3-6 inch square or round, typically 1,500-4,000 lumens | $30 – $150 | Versatile, compact, often sold in pairs, suitable for backup, small work areas, or accent lighting. |
| Medium LED Light Bar | 10-22 inches long, often 5,000-15,000 lumens | $80 – $350 | Good balance of size and output, popular for front bumpers, roof racks. Often combo beam. |
| Large LED Light Bar | 30-50+ inches long, 15,000-40,000+ lumens | $200 – $1,000+ | Max illumination, ideal for off-road, heavy-duty work. Can require more robust mounting. |
| Halogen Work Light | Traditional bulb-based, often 500-2,000 lumens | $20 – $80 | Budget-friendly, warmer light, higher power draw, shorter lifespan. Often found in magnetic or portable versions. |
| Dedicated Scene Light | Large, high-output, wide-angle flood light (often LED) | $300 – $1,500+ | Designed for emergency vehicles/large work sites. Extremely wide beam. High lumens. |
| Magnetic Mount LED Light | Portable LED light with a strong magnetic base, often 1,000-5,000 lumens | $50 – $200 | Temporary placement, no drilling required. Great for roadside repairs or flexible work. |
| LED Rock Light Kit | Set of 4-8 small, durable LED pods for undercarriage | $70 – $300 | Illuminates terrain directly beneath the vehicle. Essential for technical off-roading. Often multi-color RGB. |
| Flush Mount LED Light | Designed to be recessed into a panel, 1,000-3,000 lumens | $40 – $120 | Clean, integrated look. Popular for rear bumpers as backup lights or side area lighting. |
| Wiring Harness Kit | Includes relay, switch, fuse, and wiring for 1-2 lights | $20 – $60 | Essential for safe and proper installation. Often purchased separately or included with higher-end lights. |
Frequently Asked Questions (FAQ)
Q1: Are utility lights legal on public roads?
A1: Generally, no. Most utility lights are designed for off-road or off-highway use only, or when the vehicle is stationary. Using them on public roads can cause severe glare for other drivers and may be illegal, leading to fines. Always check your local and state regulations.
Q2: How many lumens do I need for my utility lights?
A2: It depends on the application. For general work around the truck, 1,500-3,000 lumens per light is usually sufficient. For large area illumination or intense off-road visibility, you might need 10,000+ lumens from multiple lights or a large light bar.
Q3: What does an IP rating mean?
A3: IP stands for "Ingress Protection." The first digit indicates protection against solids (dust), and the second digit indicates protection against liquids (water). For utility lights, look for IP67 (dust tight, protected against immersion up to 1 meter for 30 minutes) or IP68 (dust tight, protected against continuous immersion) for maximum durability.
Q4: Can I install utility lights myself?
A4: Yes, with basic electrical knowledge and the right tools, many utility light installations can be done by a DIY enthusiast. However, proper wiring with a fuse and relay is crucial for safety and performance. If you’re unsure, it’s always best to consult a professional auto electrician.
Q5: What’s the difference between LED, Halogen, and HID utility lights?
A5:
- LED (Light Emitting Diode): Most common, highly efficient, very durable, long lifespan, instant-on, wide range of color temperatures. Best choice for most applications.
- Halogen: Older technology, less efficient, shorter lifespan, produces a warmer light, but generally cheaper upfront.
- HID (High-Intensity Discharge): Brighter than halogen but less efficient than LED, requires a ballast, takes time to warm up, and is more fragile. Less common in new utility light designs.
Q6: What’s the difference between a flood beam and a spot beam?
A6:
- Flood Beam: Produces a wide, diffused spread of light, ideal for illuminating a broad area close to the vehicle (e.g., a worksite, campsite).
- Spot Beam: Creates a narrow, concentrated beam that travels a long distance, excellent for long-range visibility or identifying distant objects (e.g., trail navigation, search and rescue).
Conclusion
Utility lights for trucks are far more than just accessories; they are indispensable tools that significantly enhance safety, boost productivity, and expand the operational capabilities of any truck. Whether you’re a commercial operator working long hours, an off-road enthusiast exploring remote trails, or an emergency responder on a critical mission, the right lighting setup can be a game-changer.
By understanding the different types, key features, and proper installation techniques, you can make informed decisions that illuminate your path, secure your workspace, and ensure your truck is ready for any challenge, day or night. Invest wisely, install safely, and light up your world with the power of utility lights.