Light Pods for Trucks: Illuminating Your Journey
Light Pods for Trucks: Illuminating Your Journey
For truck owners, the journey doesn’t always end when the sun goes down or the pavement disappears. Whether you’re navigating challenging off-road trails, working on a remote job site, or simply seeking enhanced visibility for safer night driving, auxiliary lighting is an indispensable upgrade. Among the myriad of lighting solutions available, light pods for trucks have emerged as a powerhouse choice, offering a compact yet incredibly potent source of illumination. These versatile, often cube-shaped or round LED lights are designed to deliver focused, intense beams that far surpass the capabilities of standard factory headlights, transforming your truck into a beacon of light ready for any adventure or task.
This comprehensive guide will delve deep into the world of light pods, exploring their benefits, the various types available, critical considerations for purchase, and practical advice for installation and optimization.
What Exactly Are Light Pods?
At their core, light pods are self-contained, high-intensity LED lighting units, typically encased in rugged, durable housings. Unlike larger light bars that stretch across a significant portion of your truck, pods are compact, usually ranging from 2 to 6 inches in size. This smaller footprint is precisely what gives them their immense versatility, allowing them to be mounted in a multitude of locations where a full light bar might not fit or be practical.
Most modern light pods utilize advanced LED (Light Emitting Diode) technology, which offers superior brightness, energy efficiency, and longevity compared to traditional incandescent or HID bulbs. Their robust construction often includes aluminum housings for heat dissipation, shatterproof polycarbonate lenses, and high IP (Ingress Protection) ratings to withstand dust, water, and extreme weather conditions.
Why Equip Your Truck with Light Pods? The Undeniable Benefits
The decision to add light pods to your truck goes beyond mere aesthetics; it’s an investment in safety, utility, and capability. Here’s why they’ve become a must-have accessory for many truck owners:
- Enhanced Visibility & Safety: Standard headlights have limitations. Light pods dramatically extend your line of sight, illuminating dark roads, hidden obstacles, and potential hazards far in advance. This is crucial for preventing accidents, especially when driving at night, in adverse weather conditions like fog or heavy rain, or on unlit rural roads.
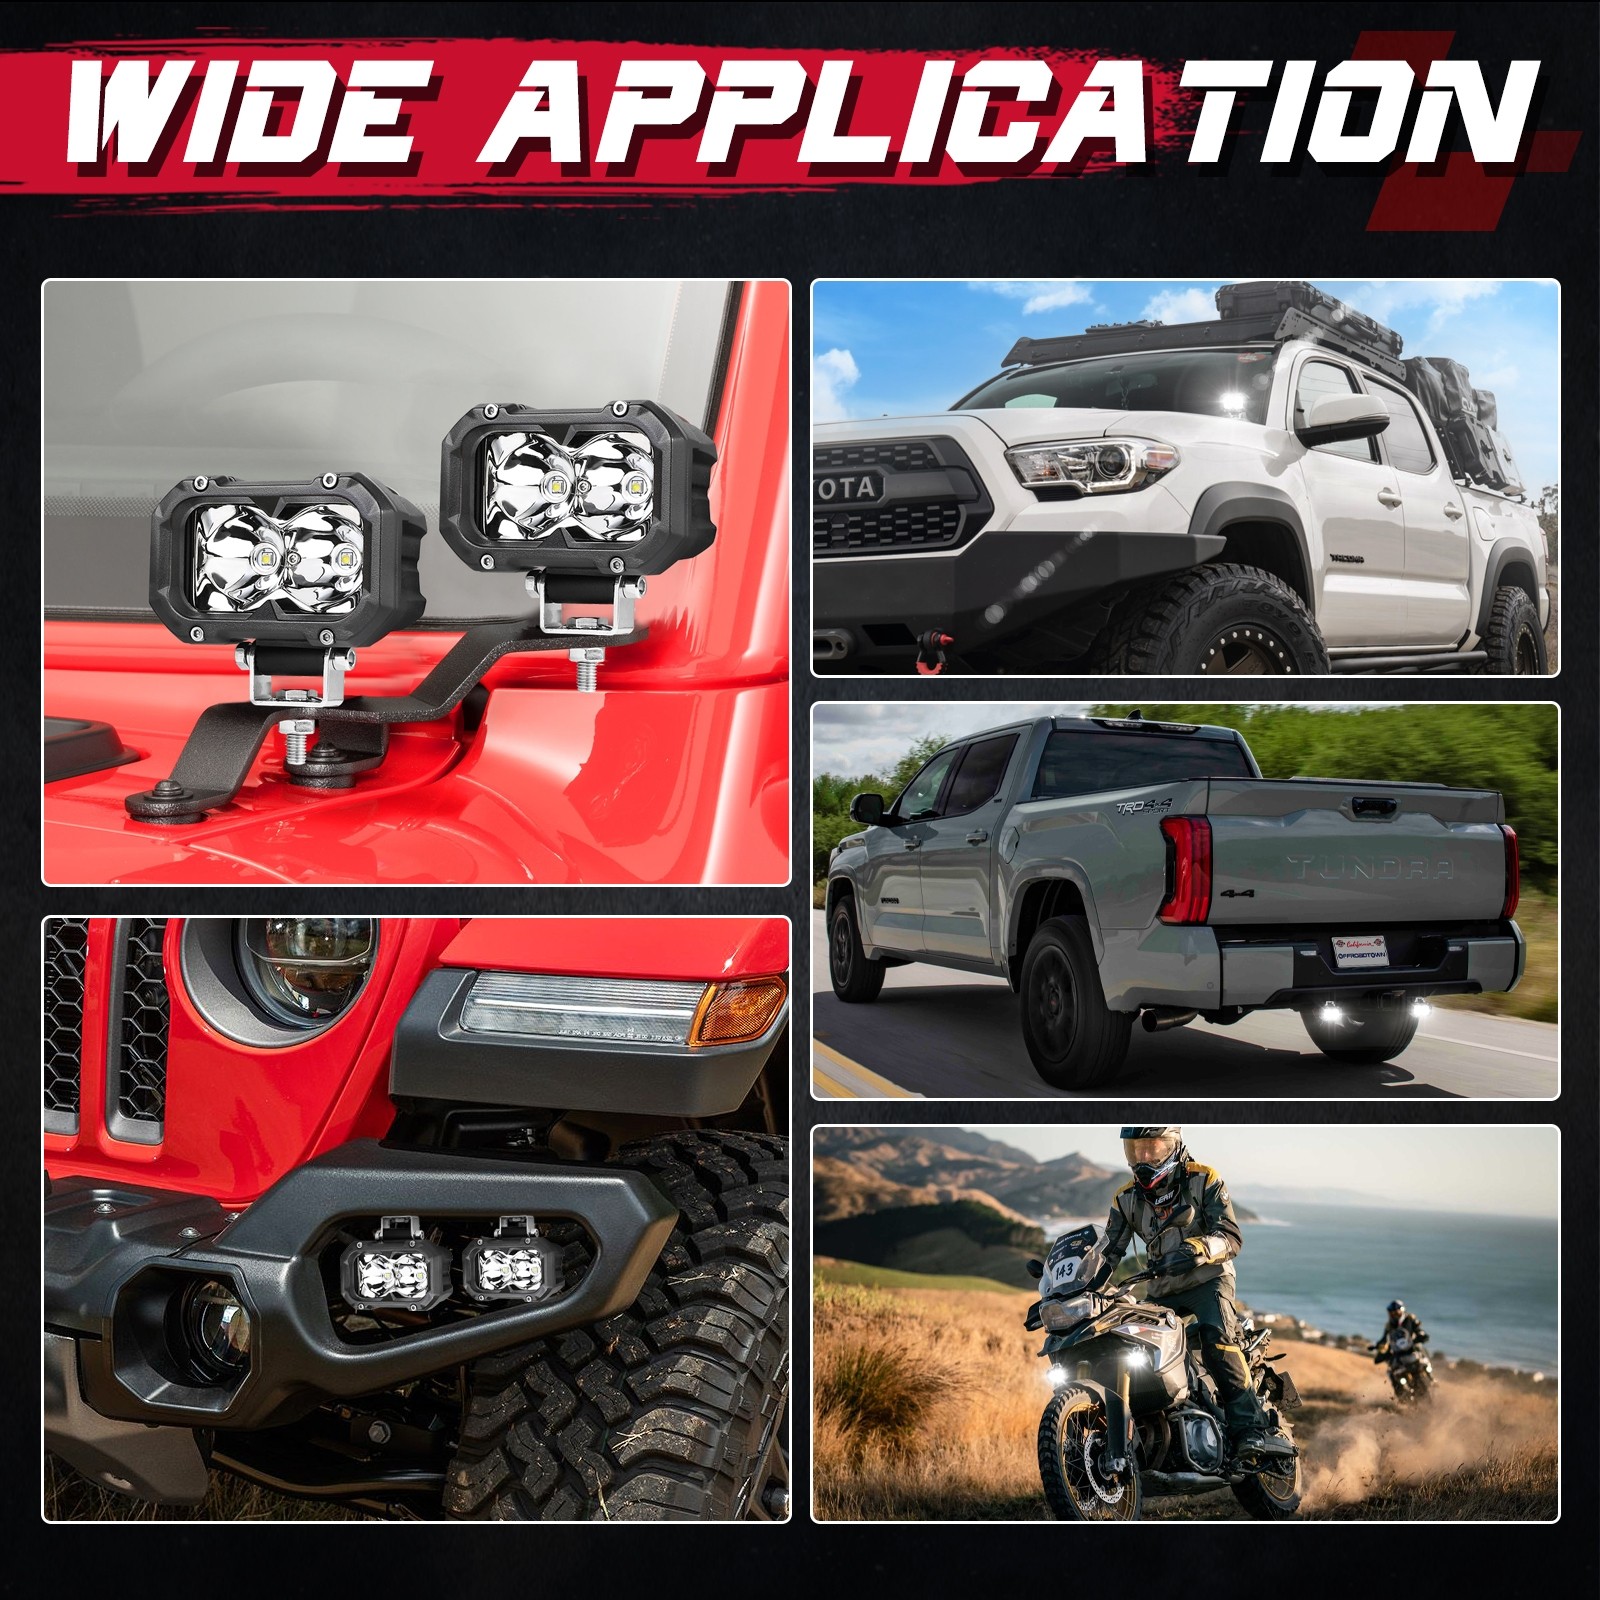
- Off-Roading & Exploration: For the avid adventurer, light pods are game-changers. Mounted on bumpers, A-pillars, or roofs, they cast powerful beams that cut through the darkest trails, revealing terrain changes, rocks, fallen logs, and wildlife. This allows for safer navigation and a more enjoyable off-road experience.
- Utility & Work Applications: Trucks are often workhorses, and light pods significantly improve productivity and safety on job sites. Rear-mounted pods illuminate trailers, cargo beds, and work areas for easier loading, unloading, and maintenance in low-light conditions. Side-mounted pods can provide essential area lighting for tasks outside the truck.
- Improved Aesthetics & Customization: Beyond their practical benefits, light pods undeniably give trucks a more aggressive, capable, and custom look. The strategic placement of these powerful lights can enhance your vehicle’s stance and reflect your adventurous spirit.
- Durability & Longevity: LED technology boasts an impressive lifespan, often rated for 50,000 hours or more, meaning your light pods will likely outlast your truck. Combined with their rugged, weather-resistant construction, they are designed to endure the harshest environments without failure.
- Energy Efficiency: LEDs draw significantly less power than older lighting technologies, reducing the strain on your truck’s electrical system and allowing for longer run times without draining your battery, especially important for work or camping setups.
Types of Light Pods: Choosing the Right Beam Pattern
The effectiveness of a light pod isn’t just about brightness; it’s about the way that light is distributed. Different beam patterns serve different purposes:
- Spot Beam: This pattern produces a narrow, highly focused beam of light that travels a long distance. Ideal for high-speed driving, spotting distant objects, or illuminating a specific point far ahead.
- Flood Beam: A flood beam spreads light over a wide area, providing excellent close-range illumination. Perfect for work lights, illuminating camp sites, or slow-speed off-roading where wide peripheral vision is needed.
- Combo Beam: As the name suggests, a combo beam combines elements of both spot and flood patterns, offering a good balance of long-distance reach and wide-area coverage. This is a popular all-around choice.
- Driving Beam: Similar to a spot beam but often designed with a specific cutoff to minimize glare for oncoming traffic, making them more suitable for on-road auxiliary lighting (where legal).
- Amber/Colored Pods: While less common for primary illumination, amber-colored pods are excellent for cutting through fog, dust, or snow, as the longer wavelength light scatters less, improving visibility in challenging atmospheric conditions.
- Work Lights: Often flood-style, these pods are specifically designed for utility and task lighting, prioritizing wide, even illumination over distance.
Key Considerations Before Purchase
Investing in light pods requires careful thought to ensure you get the best performance for your specific needs:
- Brightness (Lumens vs. Lux): Lumens measure the total light output, while Lux measures the intensity of light at a specific distance. Don’t get solely fixated on high lumen numbers; a well-designed optic can make lower lumen pods more effective than poorly designed high-lumen ones. Look for reputable brands that provide clear specifications.
- Color Temperature (Kelvin): Measured in Kelvin (K), this determines the "color" of the light. Most auxiliary lights are in the 5000K-6000K range (pure white to cool white), which mimics natural daylight and is great for clarity. Lower Kelvin numbers are warmer (more yellow), higher numbers are cooler (more blue).
- Durability & IP Rating: Look for robust construction (die-cast aluminum housing), shatterproof lenses (polycarbonate is common), and a high IP (Ingress Protection) rating. An IP67 rating means the light is dust-tight and can withstand immersion in water up to 1 meter for 30 minutes, while IP68 offers even better water resistance.
- Mounting Options: Consider where you want to mount your pods (bumper, grille, A-pillar, roof rack, rear). This will influence the type of brackets and wiring required. Ensure the pod design is compatible with your desired mounting location.
- Wiring & Installation Complexity: Most light pods require a dedicated wiring harness with a relay, fuse, and switch. While DIY installation is possible for those comfortable with basic electrical work, complex setups or integrating with existing wiring may warrant professional installation.
- Legality: Crucially, check your local and state laws regarding auxiliary lighting. Many jurisdictions have strict rules about the number, placement, and use of off-road lights on public roads. In most places, off-road lights are only legal for use when the vehicle is off public highways.
- Brand Reputation & Warranty: Stick with reputable brands known for quality and customer support. A good warranty provides peace of mind.
Installation Guide: A Step-by-Step Overview
While specific steps vary by product and mounting location, a general installation process for light pods includes:
- Gather Tools: You’ll need basic hand tools (wrenches, screwdrivers), wire cutters/strippers, a drill (for some mounts), electrical tape, heat shrink tubing, and zip ties.
- Choose Mounting Location: Decide where you want your pods. Popular spots include:
- Front Bumper/Grille: For forward illumination.
- A-Pillar/Ditch Lights: Excellent for side illumination on trails.
- Roof Rack: For maximum height and spread, often with a wider beam.
- Rear Bumper: For backup or work lights.
- Secure the Pods: Attach the light pods to their mounting brackets and then secure the brackets to your truck. Ensure they are firmly bolted down to prevent vibration and movement.
- Wiring the System: This is the most critical step.
- Power Source: Connect the positive wire from your harness (with an inline fuse) directly to your truck’s battery.
- Ground: Connect the ground wire from the harness to a clean, unpainted metal surface on the truck’s chassis.
- Relay: The relay is essential for protecting your truck’s electrical system by allowing a low-current switch to control a high-current circuit. Connect the relay according to the wiring diagram.
- Switch: Run the switch wire from the relay into the cabin to your chosen switch location (e.g., dashboard, auxiliary switch panel).
- Light Pods: Connect the positive and negative wires from the light pods to the corresponding wires on the relay output.
- Test the Lights: Before tidying up, test the lights to ensure they function correctly.
- Cable Management: Secure all wiring with zip ties, ensuring it’s away from hot engine parts, moving components, and sharp edges. Use loom or conduit for added protection.
- Aiming: Once installed, properly aim your light pods. For forward-facing lights, aim them slightly down to avoid blinding oncoming traffic (when off-road) and to illuminate the immediate terrain effectively.
Always consult the manufacturer’s instructions for your specific light pods and wiring harness. If you’re uncomfortable with electrical work, it’s highly recommended to seek professional installation.
Tips for Optimizing Your Light Pod Setup
- Mix & Match: Don’t be afraid to use different beam patterns for different locations. For example, a combo beam on the bumper with spot beams on the roof for maximum versatility.
- Strategic Placement: Consider your primary use. If off-roading, A-pillar or ditch lights are invaluable for illuminating sides. If for work, rear or side-mounted flood pods are best.
- Quality Wiring Components: Don’t skimp on wire gauge, fuses, relays, and switches. Substandard components can lead to performance issues or even electrical fires.
- Regular Cleaning: Keep your light pod lenses clean. Mud, dust, and grime can significantly reduce light output.
- Understand & Abide by Laws: Be aware of when and where you can legally use your auxiliary lights. Many states require covers on off-road lights when on public roads.
Potential Challenges & Solutions
- Glare to Oncoming Traffic: This is the most common concern. Solution: Use light pod covers on public roads, ensure proper aiming, and only activate them when off-road or in situations where no other vehicles are present.
- Complex Wiring: Solution: Purchase a complete, pre-wired harness, or seek professional installation from an automotive electrician.
- Vibration/Loose Mounts: Solution: Use high-quality, sturdy mounting brackets. Consider applying thread-locking compound (Loctite) to bolts to prevent them from loosening due to vibration.
- Water Intrusion/Fogging: Solution: Ensure your pods have a high IP rating (IP67/IP68) and that all wiring connections are sealed (heat shrink tubing, dielectric grease).
- Cost: While quality light pods can be an investment, consider them a long-term asset for safety and utility. Look for sales, but prioritize quality over the absolute lowest price.
Light Pods for Trucks: Estimated Price Table
Prices for light pods can vary widely based on brand, size, lumen output, IP rating, and included features. The table below provides a general range for a pair of light pods.
| Category | Price Range (Per Pair) | Key Features | Ideal Use Case |
|---|---|---|---|
| Entry-Level | $30 – $80 | Basic LED, moderate lumen, often generic brand, decent IP rating (IP67) | Budget-conscious, light utility/work, basic off-roading, temporary use |
| Mid-Range | $80 – $250 | Branded LEDs (e.g., Cree, Osram), higher lumen, better optics, robust IP67/68, good heat management | Serious off-roading, regular utility/work, enhanced safety, enthusiast level |
| Premium | $250 – $600+ | Top-tier LEDs, cutting-edge optics, extreme lumen/lux, superior IP68/69K, advanced thermal management, long warranty | Professional use, extreme off-roading, competitive events, maximum performance |
Note: Prices are approximate and can fluctuate. Some kits may include wiring harnesses, while others may require separate purchase.
Frequently Asked Questions (FAQ)
Q1: Are light pods legal for on-road use?
A1: Generally, no. Most light pods are designed as off-road auxiliary lights and are too bright for public roads. Using them on public highways can blind oncoming drivers and is illegal in most jurisdictions. Always check your local laws and use covers when on public roads.
Q2: How many lumens do I need for my light pods?
A2: It depends on your intended use. For general work lights, 1,000-3,000 lumens per pod might suffice. For serious off-roading, 4,000-8,000+ lumens per pod (or more for larger setups) are common. However, focus more on effective lux output and beam pattern rather than just raw lumens.
Q3: Can I install light pods myself?
A3: If you have basic electrical knowledge and are comfortable with wiring, a simple installation can be a DIY project. However, for more complex setups, integrating with existing vehicle systems, or if you’re unsure, professional installation is recommended for safety and optimal performance.
Q4: What’s the difference between a spot and a flood beam?
A4: A spot beam is narrow and focused, designed for long-distance illumination. A flood beam is wide and diffused, ideal for illuminating a broad, close-range area. Many setups use a combination of both.
Q5: Do light pods drain the truck’s battery?
A5: Modern LED light pods are highly energy-efficient and draw less power than older halogen lights. However, leaving them on for extended periods with the engine off can still drain your battery, especially if you have multiple pods. It’s always wise to monitor battery voltage if using them for long durations without the engine running.
Q6: How durable are light pods?
A6: High-quality light pods are designed to be extremely durable, featuring robust aluminum housings, shatterproof polycarbonate lenses, and high IP ratings (like IP67 or IP68) for excellent resistance against dust, water, and vibration.
Q7: What is an IP rating?
A7: IP stands for Ingress Protection, and the rating indicates how well an electrical enclosure is sealed against foreign objects (like dust) and moisture. The first digit refers to solids (0-6, with 6 being dust-tight), and the second digit refers to liquids (0-9K, with 7 being submersible up to 1m, and 8 being submersible beyond 1m).
Conclusion
Light pods for trucks are more than just an accessory; they are a fundamental upgrade that significantly enhances your vehicle’s capability, safety, and versatility. From illuminating the darkest trails and improving visibility in challenging conditions to providing essential lighting for work and recovery, these compact powerhouses empower your truck for any scenario. By understanding the different types, considering key factors before purchase, and ensuring a proper installation, you can unlock a new level of confidence and capability, truly illuminating your journey wherever the road—or the lack thereof—may take you.
