Lifted Trucks Escalade: The Ultimate Guide to Elevated Luxury and Capability
Lifted Trucks Escalade: The Ultimate Guide to Elevated Luxury and Capability
The Cadillac Escalade has long stood as a paragon of American luxury, a full-size SUV synonymous with opulence, comfort, and a commanding presence. But for a growing segment of enthusiasts and luxury vehicle owners, the standard Escalade, impressive as it is, simply isn’t enough. They seek an even more imposing stance, enhanced capability, and an undeniable custom aesthetic that sets their vehicle apart. This desire gives rise to the phenomenon of the lifted trucks Escalade – a modification that transforms an already grand SUV into an elevated behemoth of luxury and power.
A lifted Escalade is more than just a vehicle; it’s a statement. It represents the fusion of Cadillac’s renowned sophistication with the rugged appeal and improved functionality of a performance truck. Whether for navigating challenging terrains, achieving a distinctive visual flair, or simply enjoying a higher vantage point on the road, lifting an Escalade unlocks a new dimension of driving experience. This comprehensive guide will delve into every aspect of lifting an Escalade, from the ‘why’ to the ‘how,’ ensuring you have all the information needed to embark on this exhilarating modification journey.
Why Lift an Escalade? The Allure of Height and Power
The decision to lift an Escalade is driven by a blend of aesthetic desires, practical benefits, and a pursuit of personalized performance. Understanding these motivations is key to appreciating the allure of a lifted luxury SUV.
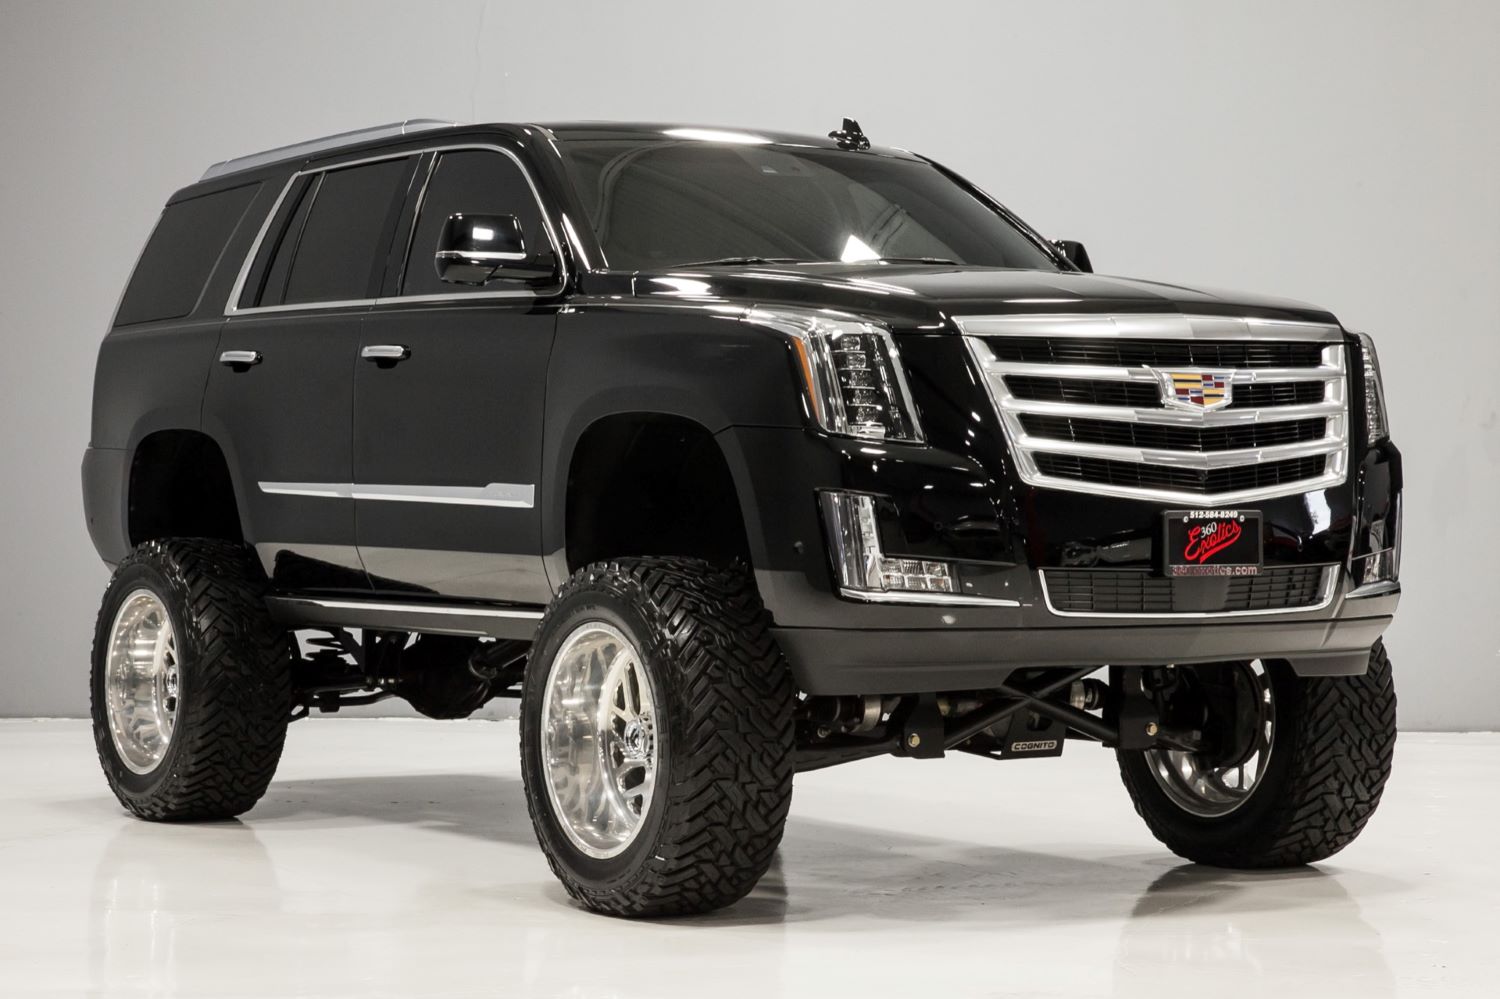
- Unrivaled Aesthetics and Presence: At its core, lifting an Escalade is about making a visual statement. A lifted stance, often complemented by aggressive wheels and oversized tires, gives the Escalade an undeniably imposing and powerful look. It transforms the vehicle from a luxury cruiser into a head-turning, custom machine that dominates the road. This aesthetic appeal is a primary driver for many owners.
- Enhanced Off-Road Capability: While not traditionally an off-road beast, lifting an Escalade significantly improves its ground clearance and approach/departure angles. This makes it more capable of traversing rough trails, navigating deep snow, or handling unpaved roads with greater ease, reducing the risk of scraping the undercarriage. For those who occasionally venture beyond the pavement, a lift kit unlocks new possibilities.
- Improved Visibility: A higher driving position offers an elevated perspective of the road ahead, providing a clearer view over traffic and obstacles. This enhanced visibility can contribute to a more confident and safer driving experience, especially in dense urban environments or on crowded highways.
- Accommodating Larger Tires: Lifting the suspension is often a prerequisite for fitting larger, more aggressive off-road tires. These tires not only enhance the vehicle’s rugged appearance but also provide superior traction and durability for various driving conditions, from mud to rocks.
- Personalization and Uniqueness: In a world where many luxury SUVs look similar, a lifted Escalade stands out. It’s a canvas for personalization, allowing owners to express their individual style and create a truly unique vehicle that reflects their personality and passion for automotive customization.
However, it’s also important to acknowledge potential challenges, including increased costs, changes in handling dynamics, potential impact on fuel economy, and considerations regarding warranty and legality.
Understanding the Lift Kit Components
Lifting an Escalade involves modifying its suspension system. The components used vary depending on the desired lift height and the specific generation of the Escalade.
- Suspension Lift Kits: These are the most common and effective way to achieve significant lift. They involve replacing or modifying key suspension components:
- Coil Springs/Struts: Taller, stiffer springs or extended struts are installed to increase ride height.
- Shocks: Longer shock absorbers are necessary to accommodate the increased suspension travel.
- Control Arms/Trailing Arms: Extended or adjustable control arms are often included to correct suspension geometry, especially at higher lift heights, ensuring proper alignment and handling.
- Leaf Springs (older models): Some older Escalade models might use leaf springs at the rear, which can be replaced with taller ones or augmented with add-a-leaf kits.
- Lift Blocks: Used in conjunction with leaf springs or sometimes with coil springs (though less common for serious lifts), these simply sit between the axle and the spring to raise the vehicle.
- Spindles/Knuckles: Drop spindles can sometimes be used in conjunction with other components to achieve lift while maintaining some factory geometry.
- Body Lift Kits: These kits use spacers placed between the vehicle’s body and its frame, effectively raising the body without altering the suspension geometry. While less expensive and simpler to install, they don’t increase ground clearance (only the body sits higher) and are generally limited to 1-3 inches. They are sometimes used in conjunction with suspension lifts to achieve maximum height.
- Tires and Wheels: Larger diameter tires are almost always part of a lifted Escalade package. This necessitates wheels with appropriate backspacing and offset to prevent rubbing against fenders or suspension components, especially during turns or suspension articulation.
- Drivetrain Modifications: For lifts exceeding 3-4 inches, additional drivetrain modifications may be required to prevent premature wear and ensure proper function:
- Driveshaft Angle Correction: Lift kits can change the angle of the driveshaft, potentially leading to vibrations. Shims or new driveshafts may be needed.
- Differential Re-gearing: Larger tires effectively change the final drive ratio, reducing acceleration and potentially straining the transmission. Re-gearing the differentials restores optimal performance.
- Brake Line Extensions: Longer brake lines may be necessary to accommodate the increased distance between the frame and the wheels.
- Air Suspension Compatibility: Modern Escalades often feature adaptive air suspension (e.g., Magnetic Ride Control, Air Ride Adaptive Suspension). Lifting these systems requires specialized kits that either replace the air springs with traditional coils or include brackets/sensors that recalibrate the air suspension’s height settings.
Types of Lift Kits for Escalades
The range of lift kits available caters to various needs and budgets, offering different levels of elevation and complexity.
- Leveling Kits (1-2 inches front only): These kits are designed to raise the front of the Escalade to match the factory rake (where the rear sits slightly higher than the front). They provide a subtle lift, allowing for slightly larger tires and a more aggressive stance without significantly altering the vehicle’s dynamics. They are typically the most affordable and easiest to install.
- Mild Lifts (2-3 inches): These kits offer a noticeable increase in height, often involving new coil springs or spacers for all four corners. They strike a balance between aesthetics, moderate off-road capability, and maintaining decent ride quality. They can usually accommodate 33-inch tires with minor trimming.
- Moderate Lifts (4-6 inches): This category represents a significant transformation. These kits usually involve more comprehensive component replacement (springs, shocks, control arms, possibly knuckles) and often require drivetrain modifications. They dramatically improve ground clearance and allow for 35-inch or even 37-inch tires, making the Escalade genuinely imposing and capable for more challenging off-road excursions.
- Extreme Lifts (6+ inches): Reserved for the most dedicated enthusiasts, these kits push the boundaries of height and capability. They are highly complex, requiring extensive modifications to suspension, steering, and drivetrain. While offering maximum ground clearance and allowing for very large tires (37 inches and up), they significantly impact handling, ride comfort, and require substantial ongoing maintenance. These are often show trucks or built for extreme off-roading.
- Coilover Conversions: For performance-oriented owners, coilover kits offer adjustable ride height and damping, allowing for fine-tuning of the suspension for specific driving conditions or preferences. They are typically more expensive but provide superior ride quality and control.
The Installation Process: A Step-by-Step Overview
While a full DIY installation is only recommended for experienced mechanics with proper tools, understanding the general process is crucial. For most moderate to extreme lifts, professional installation is highly recommended.
- Preparation:
- Gather all necessary tools (jacks, jack stands, wrenches, impact gun, torque wrench).
- Ensure the vehicle is on a flat, stable surface.
- Disconnect the battery for safety.
- Review the lift kit instructions thoroughly.
- Disassembly:
- Lift the vehicle and secure it on jack stands.
- Remove wheels and tires.
- Carefully disconnect and remove the factory suspension components (shocks, springs, control arms, sway bar links, brake lines).
- For body lifts, body mounts are unbolted.
- Installation of New Components:
- Install new lift kit components (extended springs, shocks, control arms, knuckles, etc.) according to manufacturer instructions. This often involves careful alignment and torque specifications.
- Route new brake lines if provided.
- For body lifts, spacers are placed between the frame and body, and new bolts are installed.
- Drivetrain Adjustments (if necessary):
- Install differential drop brackets to correct driveshaft angles.
- Install extended driveshafts if required.
- Adjust steering components to maintain proper geometry.
- Reassembly and Alignment:
- Reinstall wheels and tires (the larger ones!).
- Lower the vehicle slowly.
- Crucially, perform a professional wheel alignment immediately. Lifting significantly alters suspension geometry, and a proper alignment is essential for safe driving, tire wear, and handling.
- Post-Installation Checks:
- Test drive the vehicle in a safe environment. Listen for unusual noises, check braking, and steering.
- Re-torque all bolts after a few hundred miles, as components can settle.
Important Considerations Before Lifting Your Escalade
Lifting an Escalade is a significant modification with several implications that prospective owners must consider.
- Legalities and Regulations: Vehicle modification laws vary by state and municipality. Check local regulations regarding maximum vehicle height, tire protrusion, and fender flare requirements. Non-compliance can lead to fines or failure of vehicle inspections.
- Safety and Handling:
- Higher Center of Gravity: A lifted vehicle has a higher center of gravity, which can increase the risk of rollovers, especially during sharp turns or evasive maneuvers. Drive cautiously and adjust your driving style.
- Braking Performance: Larger, heavier tires can increase stopping distances. Upgrading brakes might be a wise investment for extreme lifts.
- Visibility for Others: Your elevated position might make it harder to see smaller vehicles immediately around your truck.
- Performance Impact:
- Fuel Economy: Larger tires and increased aerodynamic drag from a higher stance will almost certainly decrease fuel efficiency.
- Acceleration: Larger tires require more power to turn, which can reduce acceleration unless accompanied by re-gearing.
- Towing Capacity: While a lift doesn’t inherently reduce towing capacity, the added weight of larger tires and altered geometry can impact stability and trailer sway. Check manufacturer guidelines.
- Maintenance and Wear: Lift kits can put additional stress on factory components. Expect increased wear on ball joints, tie rods, wheel bearings, and universal joints. Regular inspections and maintenance are vital.
- Warranty Implications: Most vehicle manufacturers will void the factory warranty on components directly affected by aftermarket modifications. Research this thoroughly before proceeding.
- Cost: Beyond the kit itself, consider installation labor, new tires and wheels, potential re-gearing, alignment, and ongoing maintenance. The costs can quickly add up.
Customization Beyond the Lift
The lift is often just the beginning. Owners of lifted Escalades frequently pursue further modifications to complete their vision.
- Aggressive Wheels and Tires: Essential for the lifted look, choices range from polished chrome to matte black, with tire treads from all-terrain to mud-terrain.
- Fender Flares: Necessary to cover wider tires and comply with legal requirements, flares also add to the aggressive aesthetic.
- Auxiliary Lighting: Light bars, fog lights, and rock lights enhance visibility and off-road functionality, while also adding a rugged appeal.
- Aftermarket Bumpers: Heavy-duty front and rear bumpers offer improved protection and often allow for winch installation, recovery points, and integrated lighting.
- Performance Upgrades: Engine tuning, cold air intakes, and exhaust systems can restore lost power from larger tires or simply enhance the Escalade’s already potent performance.
- Interior Enhancements: Custom upholstery, upgraded infotainment, and unique trim pieces can ensure the interior matches the exterior’s bespoke luxury.
Driving a Lifted Escalade: Tips and Best Practices
Adjusting your driving style is crucial for safety and longevity when operating a lifted Escalade.
- Adjusted Driving Style: Take corners slower, be mindful of increased braking distances, and allow more space for maneuvers.
- Parking Challenges: Be aware of increased height for garages, car washes, and low overhangs. Parking spots may also feel tighter.
- Off-Roading Techniques: If you plan to off-road, learn proper techniques, scout your route, and never venture alone. Engage relevant 4WD settings and utilize your newfound ground clearance wisely.
- Regular Inspections: Periodically check all suspension components for wear, looseness, or damage. Pay close attention to tire pressure and alignment.
- Maintain Drivetrain: Lubricate components, check fluid levels, and be attentive to any unusual noises or vibrations.
Practical Advice and Actionable Insights
For anyone considering lifting their Escalade, here are key takeaways:
- Do Your Research: Thoroughly investigate different lift kit brands, types, and their compatibility with your specific Escalade year and trim. Read reviews and seek advice from experienced owners.
- Define Your Purpose: Are you aiming for aesthetics, off-road capability, or a balance of both? Your primary use will dictate the appropriate lift height and kit type.
- Budget Realistically: Factor in not just the lift kit, but also installation, new wheels and tires, potential re-gearing, alignment, and future maintenance.
- Choose Reputable Brands: Invest in high-quality lift kits from established manufacturers known for durability and engineering. Cheap kits can compromise safety and ride quality.
- Professional Installation is Key: For anything beyond a simple leveling kit, entrust the installation to a certified shop specializing in suspension work. Their expertise ensures proper installation, alignment, and safety.
Lift Kit Price Guide for Cadillac Escalade (Estimates)
This table provides estimated costs for various components and services related to lifting a Cadillac Escalade. Prices can vary significantly based on brand, quality, location, and specific vehicle generation.
| Component/Service | Type/Size | Estimated Cost (USD) | Notes