Illuminating Your Rig: The Comprehensive Guide to Pickup Truck Chicken Lights
Illuminating Your Rig: The Comprehensive Guide to Pickup Truck Chicken Lights
In the vast landscape of truck modifications, few additions carry as much character and tradition as "pickup truck chicken lights." Far from being a mere whimsical accessory, these distinctive amber (and sometimes other colored) marker lights adorning the perimeters of pickup trucks have evolved into a statement of style, a nod to trucking heritage, and a practical enhancement. Whether you’ve seen them gracing the cab roof of a workhorse Ford F-Series, outlining the running boards of a custom Ram, or adding a subtle glow to a lifted Chevrolet, chicken lights are an unmistakable signature. This comprehensive guide will delve into every facet of pickup truck chicken lights, from their origins and aesthetic appeal to installation tips, legal considerations, and more, helping you understand why these seemingly simple lights hold such a significant place in the world of truck enthusiasts.
The Allure of Chicken Lights: More Than Just Illumination
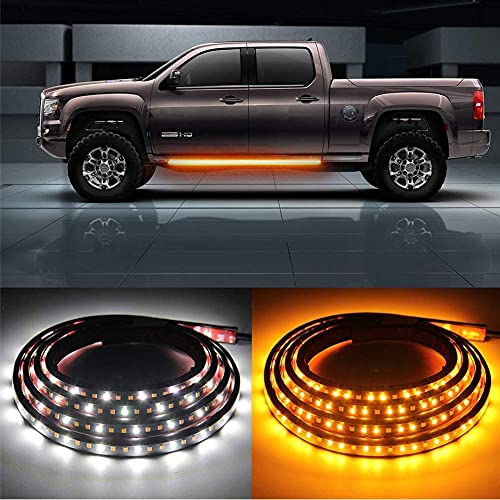
At its core, a "pickup truck chicken light" refers to any small, typically amber-colored auxiliary light, often LED, mounted in a series along the exterior of a pickup truck. The quirky moniker is believed to have originated from their resemblance to the string lights often found on chicken coops, or perhaps from their prevalence on trucks that hauled livestock, specifically chickens. Regardless of the exact etymology, the term has stuck, becoming an endearing and widely recognized descriptor for these distinctive truck illuminations.
Their importance and relevance extend beyond mere decoration:
- Aesthetic Appeal & Personalization: Chicken lights are a powerful tool for customization. They transform the truck’s silhouette, especially at night, giving it a more robust, purposeful, and often nostalgic big-rig appearance. Owners use them to express their personality, making their vehicle stand out in a crowd of stock trucks.
- Enhanced Visibility & Safety: While primarily aesthetic, chicken lights do contribute to safety. By outlining the truck’s dimensions, particularly its width, they make the vehicle more visible to other drivers in low-light conditions, fog, rain, or snow. Side marker lights, in particular, improve lateral visibility, reducing the risk of side-impact collisions.
- Tribute to Big Rig Culture: Many pickup truck owners admire the imposing presence of semi-trucks. Chicken lights are a direct homage to the extensive lighting found on 18-wheelers, allowing pickup owners to infuse a piece of that iconic trucking culture into their smaller rigs. It’s a way of celebrating the working-class roots and powerful image associated with heavy-duty vehicles.
- Community & Identity: Among truck enthusiasts, chicken lights are a recognized feature that signals an owner’s dedication to their vehicle and their participation in a broader subculture. They foster a sense of identity and belonging, often sparking conversations at truck meets and shows.
Anatomy of Chicken Lights: Types and Placement
Understanding the various types and strategic placement options for pickup truck chicken lights is crucial for achieving the desired look and functionality.
Types of Lights:
- LED vs. Incandescent:
- LED (Light Emitting Diode): The overwhelming choice today. LEDs are highly energy-efficient, drawing minimal power, which is vital for multiple lights. They offer superior longevity (tens of thousands of hours), are more durable against vibrations and impacts, and produce a brighter, crisper light. They also run cooler than incandescent bulbs.
- Incandescent: Older technology, less common for new installations. They consume more power, generate heat, and have a shorter lifespan. However, some traditionalists prefer their warmer, softer glow.
- Lens Colors:
- Amber: The traditional and most common color, especially for side and front-facing marker lights, adhering to DOT regulations for auxiliary lighting.
- Clear/Smoked: Often used with amber LEDs for a cleaner look when off, illuminating amber when on.
- Red: Typically reserved for rear-facing marker lights, similar to taillights.
- RGB (Multi-color): Some modern kits offer RGB LEDs, allowing color changes via a remote or app. While visually striking, their legality varies significantly by region and usage (e.g., usually only amber/red allowed on public roads).
- Sizes and Shapes: Chicken lights come in a variety of forms, including small "bullet" or "button" lights, standard rectangular or oval marker lights, and flexible LED strips. The choice depends on the desired aesthetic and mounting location.
Common Placement Areas:
Strategic placement is key to achieving the classic chicken light look and maximizing visibility:
- Cab Roof: Perhaps the most iconic placement, mimicking semi-trucks. Typically, five amber lights are installed across the front of the cab roof, often slightly curved to match the roofline.
- Running Boards/Rock Sliders: Lights mounted along the underside or outer edge of running boards illuminate the ground around the truck, providing practical lighting for entry/exit and enhancing side visibility.
- Underbody/Frame Rails: LED strips or small pods can be mounted along the frame rails, casting an ambient glow beneath the truck. This is often combined with wheel well lighting for a comprehensive underglow effect.
- Bumpers (Front and Rear): Small marker lights can be recessed into or mounted on the front and rear bumpers, adding definition and extra visibility.
- Fender Flares: If your truck has extended fender flares, small lights can be integrated into them, highlighting the width of the vehicle.
- Grille: Some owners opt to place small amber lights within the grille, creating a unique front-end signature.
- Rear of the Cab/Headache Rack: Lights can be mounted on the back of the cab or integrated into a headache rack, providing rearward visibility and completing the 360-degree illumination.
DIY Installation Guide: Lighting Up Your Rig
Installing pickup truck chicken lights can be a rewarding DIY project, but it requires careful planning and execution. If you’re not comfortable with automotive electrical work or drilling into your truck’s body, professional installation is recommended.
1. Planning is Key:
- Legal Considerations: Before buying any lights, research your local state and municipal laws regarding auxiliary lighting color, brightness, and placement. Amber is generally acceptable for side markers, but rules for front and rear vary.
- Power Source: Decide how your lights will be powered. Common options include tapping into the parking light circuit (so they come on with your headlights/parking lights), or wiring them to a dedicated auxiliary switch for independent control.
- Wiring Diagram: Sketch out your wiring plan. Determine where the wires will run, where they’ll be grounded, and how they’ll connect to the power source.
2. Tools and Materials:
- Lights: Your chosen chicken lights (LEDs recommended).
- Wire: Automotive-grade wire (e.g., 16-18 gauge), sufficient length.
- Connectors: Heat-shrink butt connectors, quick-disconnects.
- Heat Shrink Tubing: For waterproofing connections.
- Wire Strippers/Crimpers: Essential for proper connections.
- Multimeter: For testing circuits and voltage.
- Drill & Drill Bits: If mounting lights that require holes (e.g., cab roof). Use step bits for clean holes.
- Silicone Sealant: For sealing drilled holes, especially on the cab roof, to prevent leaks.
- Fuse Tap (Add-a-Circuit): For safely tapping into the fuse box.
- Relay (Optional but Recommended): For larger installations to protect your vehicle’s existing circuits.
- Zip Ties/Cable Clips: For securing and neatening wiring.
- Screwdrivers/Wrenches: As needed for mounting.
3. Step-by-Step Process:
- Disconnect Battery: Always disconnect the negative terminal of your vehicle’s battery before starting any electrical work.
- Measure and Mark: Carefully measure and mark the precise locations for each light. Use masking tape to protect paint and mark drill points.
- Drill Holes (If Required): If installing cab roof lights or other flush-mount lights, drill pilot holes, then use the appropriate size bit. For cab roof, be extremely cautious not to drill too deep and damage the headliner. Deburr holes and apply rust-inhibiting primer to bare metal edges.
- Mount Lights: Securely mount each light according to its design. For cab lights, apply a bead of silicone sealant around the base before tightening to ensure a waterproof seal.
- Run Wiring: Route the wiring discreetly and safely. Avoid sharp edges, moving parts, or hot components like exhaust pipes. Use existing wire loom or conduit where possible. Run wires through grommets when passing through the firewall.
- Connect to Power Source:
- Fuse Box (Recommended): Use a fuse tap to connect to a switched 12V circuit that activates with your parking lights or ignition (e.g., radio, accessory power). Consult your vehicle’s fuse diagram.
- Dedicated Switch: For independent control, wire to a standalone switch in the cabin, powered via a fused connection from the battery. Use a relay if connecting many lights.
- Grounding: Ensure each light or string of lights has a solid ground connection to the vehicle’s chassis or a factory ground point. A poor ground is a common cause of issues.
- Test Connections: Before tidying up, reconnect the battery and test all lights to ensure they function correctly.
- Secure All Wiring: Use zip ties, cable clips, and wire loom to secure all wiring, preventing chafing, tangling, and a messy appearance. Ensure all exterior connections are waterproofed with heat shrink.
- Reconnect Battery: Once everything is secure and tested, reconnect the negative battery terminal.
Important Considerations and Best Practices
- Legality: This cannot be stressed enough. Laws regarding auxiliary lighting vary by state, county, and even city. Generally, amber lights are acceptable for side markers and cab clearance lights. Red lights are almost exclusively for rear-facing applications. Blue, green, or flashing lights are often illegal on public roads for non-emergency vehicles. Always check your local Department of Motor Vehicles (DMV) or Department of Transportation (DOT) regulations.
- Waterproofing: Any exterior light or connection is exposed to the elements. Use marine-grade heat shrink connectors, silicone sealant, and ensure lights themselves are rated for outdoor use (IP67 or IP68 are good standards).
- Power Management: Do not overload existing circuits. For extensive lighting setups, use a relay to draw power directly from the battery (via a fused line) while using a low-current trigger from an existing circuit or switch.
- Durability & Quality: Invest in high-quality LED lights. Cheap lights may fail quickly, develop moisture issues, or have inconsistent brightness. Look for reputable brands.
- Aesthetics vs. Overkill: While more lights might seem better, there’s a fine line between a tastefully illuminated truck and one that resembles a carnival float. Aim for balance and a cohesive design.
- Maintenance: Periodically check wiring for wear, clean light lenses for optimal brightness, and inspect for any moisture intrusion.
Troubleshooting Common Chicken Light Issues
- Lights Not Working:
- Check the fuse: If wired to a fuse box, the fuse may have blown.
- Check connections: Loose or corroded wires, especially ground wires.
- Test the light itself: Connect directly to a 12V source to see if the light is faulty.
- Flickering/Dim Lights:
- Poor ground connection.
- Loose wiring connection.
- Insufficient power supply (voltage drop due to too many lights on one circuit).
- Moisture Inside Lens:
- Indicates a poor seal. If possible, disassemble, dry out, and re-seal with silicone. Otherwise, replace the light.
- Lights Draining Battery:
- Improper wiring: Lights are wired to a constant power source instead of a switched one, leading to parasitic draw.
- Faulty relay or switch: Stuck in the "on" position.
Price Table: Estimated Costs for Pickup Truck Chicken Lights
The cost of adding chicken lights can vary significantly based on the quality of components, the extent of the installation, and whether you do it yourself or hire a professional.
| Component/Service | Low End (USD) | Mid Range (USD) | High End (USD) | Notes |
|---|---|---|---|---|
| Individual LED Marker Light (ea.) | $5 | $15 | $30+ | Varies by size, brand reputation, brightness, and waterproofing rating. |
| Complete Cab Roof Light Kit | $50 | $150 | $300+ | Includes 5 lights, wiring harness, and hardware. DIY-friendly vs. premium, pre-wired kits. |
| Running Board/Underbody LED Strip Kit | $40 | $100 | $250+ | Varies by length, number of strips/pods, RGB features, and control options. |
| Wiring & Connectors | $20 | $50 | $100+ | Quality of automotive wire, heat-shrink tubing, crimp connectors, fuse taps, relays. |
| Basic DIY Tools | $30 | $70 | $150+ | Wire strippers, crimpers, basic drill, multimeter (assuming some tools are already owned). |
| Professional Installation (Labor) | $200 | $500 | $1000+ | Highly variable by shop labor rates, complexity of the job, and number of lights being installed. |
| Total DIY Project Estimate | $100 | $350 | $700+ | For a moderately sized installation (e.g., cab lights + running board lights), excluding specialized tools. |
| Total Professional Installation | $300 | $1000 | $2000+ | Includes parts and labor for a comprehensive setup, from simple cab lights to full underglow. |
Frequently Asked Questions (FAQ)
Q: Are pickup truck chicken lights legal?
A: Legality varies significantly by state and local jurisdiction. Amber lights are generally permissible for side marker and clearance purposes. However, blue, red (front-facing), green, or flashing lights are often illegal on public roads for non-emergency vehicles. Always check your local DMV or DOT regulations before installation.
Q: What’s the best color for chicken lights?
A: Amber is the traditional and most legally compliant color for general marker lighting on public roads. Red is typically reserved for rear-facing applications. While RGB (multi-color) lights exist, ensure they are set to a legal color (like amber or white, if permitted) when driving on public roads.
Q: How many chicken lights should I put on my truck?
A: There’s no fixed number; it’s a matter of personal preference and desired aesthetic. The classic cab roof setup uses five lights. For running boards or underglow, it depends on the length of the strips or the number of pods needed to achieve even illumination. Avoid overkill to maintain a tasteful appearance.
Q: Do chicken lights drain my battery?
A: Properly installed LED chicken lights draw very little power and should not drain your battery if wired to a switched circuit (e.g., parking lights, ignition-on power). If they are wired to a constant power source, they could create a parasitic draw and drain your battery over time if left on or if there’s an internal fault.
Q: Can I install pickup truck chicken lights myself?
A: Yes, many truck owners successfully install chicken lights as a DIY project. It requires basic electrical knowledge, proper tools, and careful planning, especially if drilling into the truck’s body. If you’re unsure, consulting a professional is always a safe bet.
Q: What’s the difference between LED and incandescent chicken lights?
A: LEDs are more energy-efficient, last significantly longer, are more durable, and produce a brighter, crisper light. Incandescent bulbs consume more power, generate heat, and have a shorter lifespan. For modern installations, LEDs are almost always the superior choice.
Q: Where can I buy quality pickup truck chicken lights?
A: You can find them at automotive accessory stores, truck specialty shops, and online retailers like Amazon, eBay, and dedicated truck parts websites (e.g., Recon, Putco, United Pacific, Grote). Look for lights with good reviews, proper weatherproofing (IP ratings), and a warranty.
Conclusion
Pickup truck chicken lights are more than just a passing fad; they are a deep-rooted tradition in truck culture, offering a unique blend of enhanced visibility, personal expression, and a powerful nod to the iconic aesthetic of big rigs. From the subtle glow outlining your running boards to the classic five amber lights crowning your cab, these illuminations transform a standard pickup into a distinctive, personalized machine.
Embracing chicken lights is an opportunity to make your truck truly yours, but it’s an endeavor that calls for thoughtful planning, quality components, and adherence to legal guidelines. Whether you embark on a rewarding DIY installation or opt for professional expertise, the end result is a rig that not only stands out but also proudly carries a piece of trucking heritage. In the world of pickup trucks, chicken lights are a beacon of individuality, utility, and undeniable cool.
