Light Bars for Trucks: Your Ultimate Guide to Illumination and Safety
Light Bars for Trucks: Your Ultimate Guide to Illumination and Safety
For truck owners, the journey often extends beyond paved roads and daylight hours. Whether navigating challenging off-road trails, working on a dimly lit job site, or simply seeking enhanced visibility during late-night drives, supplemental lighting becomes not just a luxury, but a necessity. This is where light bars for trucks step in. A light bar is a powerful, multi-LED lighting fixture designed to provide an expansive and intense beam of light, far surpassing the capabilities of standard vehicle headlights. More than just an aesthetic upgrade, light bars significantly improve safety, utility, and the overall driving experience for truck enthusiasts and professionals alike.
This comprehensive guide will delve into every aspect of light bars for trucks, from understanding their diverse types and the critical factors to consider before purchase, to a practical installation guide and essential maintenance tips. We’ll also cover the legal landscape and address common questions, empowering you to make an informed decision and illuminate your path forward.
Why Choose a Light Bar for Your Truck? The Multifaceted Benefits
Investing in a light bar for your truck offers a multitude of advantages that extend beyond mere illumination.
Enhanced Visibility and Safety
This is arguably the primary benefit. Light bars cut through darkness, fog, rain, and snow with incredible intensity, revealing obstacles, wildlife, and terrain features far in advance. For off-road adventurers, this means safer navigation over rough trails and through dense brush. For those driving on rural roads, it significantly reduces the risk of collisions with animals or unseen hazards. In adverse weather, the improved visibility is a critical safety net.
Improved Work Efficiency
For professionals who use their trucks as mobile workspaces, such as contractors, farmers, or first responders, a light bar transforms the vehicle into a powerful mobile lighting solution. It illuminates job sites, allows for easier loading and unloading in the dark, and ensures precision when operating equipment, drastically improving productivity and safety during night operations.
Aesthetics and Customization
Beyond their practical utility, light bars add an undeniable rugged and aggressive aesthetic to any truck. They are a popular customization choice, allowing owners to personalize their vehicle’s appearance and project a sense of capability and readiness for any adventure.
Security and Deterrence
The sheer intensity of a light bar can serve as a deterrent against potential threats. When activated, the powerful beam can illuminate a large area around your vehicle, making it an excellent tool for increasing security around campsites or remote work locations, and potentially scaring off unwanted intruders.
Types of Light Bars: Choosing the Right Illumination
Light bars come in various configurations, each designed to cater to specific lighting needs. Understanding these types is crucial for selecting the perfect bar for your truck.
Based on Beam Pattern
The beam pattern dictates how the light is dispersed:
- Spot Beam: Concentrates light into a narrow, focused beam, ideal for long-distance illumination. Perfect for seeing far ahead on open trails or highways.
- Flood Beam: Spreads light over a wide area, providing excellent peripheral visibility. Best for illuminating immediate surroundings, such as job sites or slow-speed off-roading.
- Combo Beam: Integrates both spot and flood LEDs within a single bar, offering a versatile blend of long-distance reach and wide-area coverage. This is the most popular and practical choice for general use.
- Driving Beam: Similar to a spot but with a slightly wider spread, designed to complement high beams for on-road use (where legal).
- Amber/Diffusion Lenses: Some light bars come with amber lenses or diffusion filters to reduce glare in dusty or foggy conditions, improving visibility by cutting through particulate matter more effectively.
Based on Light Source
While LED is dominant, other technologies exist:
- LED (Light Emitting Diode): The overwhelming choice for modern light bars due to their energy efficiency, long lifespan (typically 50,000+ hours), instant-on capability, durability, and compact size. They produce bright, clear light.
- HID (High-Intensity Discharge): Less common for light bars, HIDs offer intense light but require a warm-up period, are more fragile, and consume more power than LEDs.
- Halogen: Largely obsolete for light bars, halogen bulbs are inefficient, have shorter lifespans, and produce less intense light compared to LEDs.
Based on Size and Shape
Light bars range significantly in size and form factor:
- Single Row vs. Dual Row: Single-row bars are slimmer and more discreet, while dual-row bars offer greater light output due to more LEDs.
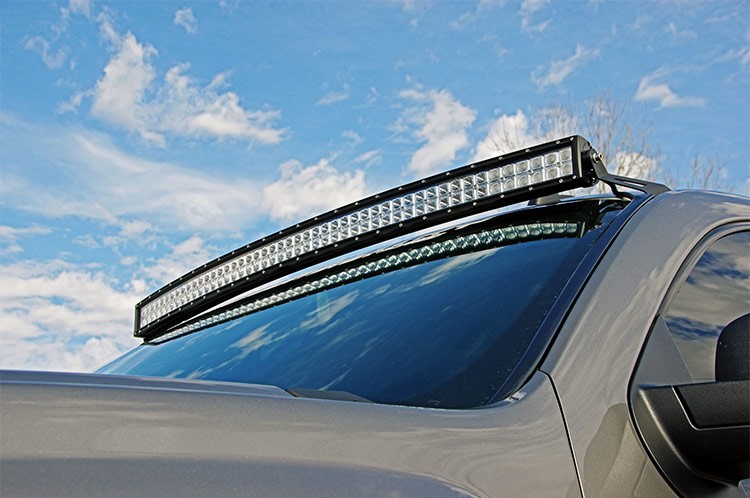
- Straight vs. Curved: Straight bars provide direct, powerful light. Curved bars offer a wider spread of light, often contouring to the truck’s roofline for a more integrated look and better peripheral vision.
- Slimline vs. Standard: Slimline bars are designed for tight spaces or a low-profile appearance.
Key Factors to Consider Before Buying
Before making a purchase, several critical factors should influence your decision to ensure you select a light bar that perfectly matches your needs and complies with regulations.
Brightness (Lumens vs. Lux)
- Lumens: Represents the total amount of light emitted by the bar. Higher lumens generally mean a brighter light.
- Lux: Measures the intensity of light at a specific distance from the source. While lumens tell you how much light there is, lux tells you how usable that light is at a given point. Focus on reputable brands that provide realistic lumen and lux ratings.
Power Consumption (Watts)
Light bars draw significant power. Ensure your truck’s electrical system (alternator and battery) can handle the additional load without strain. A higher wattage means more power draw.
Durability and Weatherproofing (IP Rating)
Your light bar will face harsh conditions. Look for an IP (Ingress Protection) rating of at least IP67 (dust tight, protected against immersion up to 1 meter for 30 minutes) or IP68 (dust tight, protected against continuous immersion). This ensures the bar is sealed against water, dust, and debris.
Build Quality
- Housing Material: Aluminum is preferred for its heat dissipation properties and corrosion resistance.
- Lens Material: Polycarbonate is highly durable and resistant to impacts and scratches, making it ideal for off-road use.
- Mounting Brackets: Stainless steel or robust aluminum brackets are essential for secure installation and resistance to vibration and corrosion.
Mounting Options
Consider where you plan to mount the light bar, as this will dictate its size and type. Common locations include:
- Bumper/Grille: Good for lower-level illumination, less wind noise.
- Roof: Provides maximum light spread and distance, but can cause wind noise and glare on the hood.
- A-Pillar: Offers directional light, good for trail navigation.
- Bed Rack: Useful for illuminating the truck bed or rearward visibility.
Legal Regulations
This is paramount. Laws regarding auxiliary lighting vary significantly by state, province, and country. Many jurisdictions restrict the use of light bars on public roads, often requiring them to be covered or wired to only operate when the vehicle’s high beams are off. Always research your local laws before installation.
Wiring Harness and Switches
A high-quality wiring harness with a relay, fuse, and a robust switch is crucial for safe and reliable operation. Never directly wire a high-power light bar without a relay and fuse.
Brand Reputation and Warranty
Choose reputable brands known for quality and reliability. A good warranty indicates the manufacturer stands behind its product.
Installation Guide: Getting Your Light Bar Mounted and Wired
While professional installation is always an option, many truck owners successfully install light bars themselves. This general guide outlines the key steps.
Tools Required
- Socket wrench set
- Wire strippers/crimpers
- Drill (if new mounting holes are needed)
- Multimeter (for testing connections)
- Zip ties/cable management
- Heat shrink tubing or electrical tape
Mounting Location Selection
Choose a location that provides the desired light coverage and fits the bar’s dimensions. Consider aesthetics, potential for glare, and local regulations.
Physical Mounting Steps
- Assemble Brackets: Attach the light bar’s mounting brackets to the bar itself.
- Position and Mark: Hold the light bar in the desired mounting location. Use a marker to indicate where mounting holes need to be drilled (if not using existing holes).
- Drill Holes (if necessary): Carefully drill pilot holes, then enlarge them to the appropriate size for your mounting hardware. Use anti-corrosion paint on exposed metal.
- Secure the Bar: Bolt the light bar securely to the truck, ensuring it’s level and stable. Do not overtighten.
Wiring Diagram and Explanation
Proper wiring is critical for safety and performance. A standard light bar wiring setup involves:
- Battery Connection: Connect the main power wire (usually red, fused) from the light bar’s harness to the positive terminal of your truck’s battery. Connect the ground wire (usually black) to the negative terminal or a solid chassis ground point.
- Relay: The relay acts as a switch, allowing a low-current signal from your switch to control the high-current flow to the light bar.
- Pin 30: Constant 12V power from the battery (fused).
- Pin 87: Output to the light bar’s positive wire.
- Pin 85: Ground.
- Pin 86: Switched 12V signal from your dash switch.
- Fuse: An inline fuse (typically 30A for most light bars) is essential and should be placed as close to the battery’s positive terminal as possible. This protects your wiring and vehicle from overcurrents.
- Switch: Run the switch wire from the relay (Pin 86) through the firewall into the cabin. Connect it to a 12V ignition-switched power source (so the light bar can’t be accidentally left on when the truck is off) and then to your chosen dash-mounted switch. The other terminal of the switch connects to ground.
- Grounding: Ensure all ground wires (from the light bar, relay, and switch) are connected to a clean, unpainted metal surface on the truck’s chassis or directly to the negative battery terminal.
Testing
Once wired, test the light bar. Turn the ignition on (if wired to ignition power), then activate the switch. Ensure the light bar illuminates correctly. Check all connections.
Professional Installation vs. DIY
If you’re uncomfortable with electrical work, drilling into your truck, or deciphering wiring diagrams, professional installation is highly recommended. It ensures safety, proper function, and avoids potential damage to your vehicle.
Maintenance and Troubleshooting Tips
Light bars are generally robust, but a little maintenance goes a long way.
- Cleaning: Regularly clean the lens and housing with mild soap and water to remove dirt, mud, and road grime. Avoid abrasive cleaners that could scratch the lens.
- Check Connections: Periodically inspect all wiring connections for corrosion, looseness, or damage. Ensure grounds are secure.
- Tighten Mounts: Check mounting bolts for tightness, especially after off-road excursions, as vibrations can loosen them.
- Troubleshooting Common Issues:
- No Power: Check the fuse first. Then, verify all wiring connections, especially grounds and the relay. Test the switch for continuity.
- Flickering: Could indicate a loose connection, a failing ground, or an inadequate power supply.
- Dim Output: May be due to dirty lens, poor wiring, or a failing LED driver.
Legality and Responsible Use
Understanding and adhering to legal regulations is paramount for light bar owners.
- On-Road vs. Off-Road Use: In most regions, it is illegal to operate a light bar on public roads. Their intense brightness can blind oncoming drivers and violate vehicle equipment laws. They are generally intended for off-road, private property, or emergency use only.
- Covers: Many jurisdictions require light bars to be covered when the vehicle is on public roads. This physically prevents accidental illumination and signals compliance.
- Aiming: When used off-road, aim your light bar appropriately. A poorly aimed bar can still create unnecessary glare for others, even in remote areas.
- Courtesy: Even where legal, always dim or turn off your light bar when approaching or following other vehicles to prevent blinding drivers. Responsible use fosters a safer environment for everyone.
Price Table: Light Bars for Trucks
The price of light bars varies widely based on size, brand, lumen output, IP rating, and features. Here’s a general price range to help you budget:
| Light Bar Type/Size (Approx.) | Beam Pattern | Lumens (Approx.) | IP Rating | Avg. Price Range (USD) | Key Features / Notes | |
|---|---|---|---|---|---|---|
| Type | Average Length/Size | Beam Pattern(s) | Max Lumens | Durability (IP Rating) | Avg. Price Range (USD) | Common Mounting Locations |
| :————————— | :——————– | :—————— | :————- | :————————- | :————————– | :—————————- |
| Small Single Row LED | 6-12 inches | Flood, Spot, Combo | 1,000 – 3,000 | IP67/IP68 | $30 – $80 | Bumper, Grille, A-Pillar, Fog Light Cutouts |
| Medium Single Row LED | 15-22 inches | Flood, Spot, Combo | 3,000 – 8,000 | IP67/IP68 | $70 – $150 | Bumper, Grille, Roof Rack |
| Large Single Row LED | 30-42 inches | Flood, Spot, Combo | 8,000 – 15,000 | IP67/IP68 | $120 – $300 | Roof, Bumper, Headache Rack |
| XL Single Row LED | 48-54 inches | Flood, Spot, Combo | 15,000 – 25,000+ | IP67/IP68 | $250 – $600+ | Roof, Headache Rack |
| Small Dual Row LED | 6-12 inches | Flood, Spot, Combo | 2,000 – 5,000 | IP67/IP68 | $50 – $120 | Bumper, Grille, A-Pillar |
| Medium Dual Row LED | 15-22 inches | Flood, Spot, Combo | 5,000 – 12,000 | IP67/IP68 | $100 – $250 | Bumper, Grille, Roof Rack |
| Large Dual Row LED | 30-42 inches | Flood, Spot, Combo | 12,000 – 25,000+ | IP67/IP68 | $200 – $500+ | Roof, Bumper, Headache Rack |
| XL Dual Row LED | 48-54 inches | Flood, Spot, Combo | 25,000 – 50,000+ | IP67/IP68 | $400 – $1000+ | Roof, Headache Rack |
| Curved LED Light Bar | 30-54 inches | Combo | 15,000 – 40,000+ | IP67/IP68 | $250 – $800+ | Roof (follows contour) |
| Slimline LED Light Bar | Various (e.g., 20", 40") | Flood, Spot, Combo | 5,000 – 15,000 | IP67/IP68 | $100 – $400 | Discreet bumper/grille, behind grille |
| Amber/Specialty LED Bar | Various | Flood, Diffusion | Varies | IP67/IP68 | $80 – $300 | Bumper, Grille, Hood |
Note: Prices are estimates and can vary significantly based on brand reputation (e.g., Rigid Industries, KC HiLites, Baja Designs vs. generic brands), specific features, included wiring harnesses, and sales/promotions. Always check reviews and product specifications.
Frequently Asked Questions (FAQ)
1. Are light bars legal for on-road use?
Generally, no. In most regions, light bars are considered auxiliary off-road lights and are illegal to use on public roads. They are typically too bright and can blind oncoming drivers. Many states require them to be covered when driving on public roads. Always check your local and state regulations.
2. How many lumens do I need?
It depends on your primary use. For general off-roading and improved visibility, a light bar with 5,000-15,000 lumens is usually sufficient. For extreme off-roading or large-scale work illumination, you might want 20,000+ lumens. More important than just lumens is the beam pattern (spot, flood, combo) for your specific needs.
3. Will a light bar drain my truck’s battery?
A properly installed LED light bar, especially when connected via a relay to an ignition-switched power source, should not drain your battery. However, if left on for extended periods with the engine off, any electrical accessory will eventually drain the battery. Ensure your truck’s alternator can handle the additional electrical load.
4. Can I install a light bar myself?
Yes, many truck owners install light bars themselves. Basic mechanical skills and an understanding of simple electrical wiring are helpful. Always use a proper wiring harness with a relay and fuse for safety. If you’re unsure, it’s best to have a professional install it.
5. What’s the difference between single-row and dual-row light bars?
Single-row light bars are slimmer and more discreet, using a single line of LEDs. Dual-row light bars have two rows of LEDs, offering greater light output (more lumens) and a wider spread, but they are bulkier. The choice depends on your aesthetic preference and required light intensity.
6. How do I choose the right size light bar for my truck?
Consider your mounting location and aesthetic preferences. Common sizes for bumpers range from 20-30 inches, while roof-mounted bars can be 40-54 inches. Measure the available space on your truck before purchasing to ensure a proper fit.
Conclusion
Light bars for trucks are an indispensable upgrade for anyone seeking to enhance their vehicle’s utility, safety, and visual appeal. From illuminating the darkest trails to boosting productivity on the job site, the benefits are clear. By understanding the different types, carefully considering crucial factors like brightness and durability, and ensuring proper (and legal) installation, you can confidently select the perfect light bar to meet your specific needs.
Remember to prioritize safety, adhere to local regulations regarding on-road use, and practice responsible operation. With the right light bar, your truck will be equipped to tackle any challenge, turning night into day and making every journey, adventure, or task more secure and efficient. Illuminate your path, and drive with confidence.